Showing posts with label FoodBlogSwap. Show all posts

Tuesday, March 29, 2016

FoodBlogSwap: American Pancakes

The FoodBlogSwap is a swap between bloggers from the Netherlands. This month I had to pick something from the blog Mammatje van Alles, which is a blog about mommyhood. The blog of course also has a lot of recipes. I had 3 recipes in my pre selection, but I decided to go back to basics and choose for American Pancakes. I have a lot of pancake and fritter recipes on the blog, but I seem to skip the basic recipes. The original recipe had blueberries in them but Nick doesn't like them, so we went all natural. Sadly the pancakes that we made aren't as thick as the original either. That is just our skill I guess. We need more practice. The taste was delicious though and that is all that matters in the end.


American Pancakes:
- 250 gr wheat flour
- 250 gr wheat meal
- 700 ml milk
- 6 eggs
- 1 tsp salt

Separate the eggs. Clean a bowl with a paper towel and some lemon juice. Beat the egg whites stiff until they have peaks. In another bowl mix the flour, meal and salt. Add the egg yolk and milk. Stir through. Lastly add the egg whites carefully in 4 parts. Heat some oil in a frying pan. Bake small pancakes golden brown on both sides. 


Friday, February 26, 2016

FoodBlogSwap: Turkish Spinach Cake

It is almost the end of the month and that means it is time for another FoodBlogSwap! This time I got to cook from Gewoon Lekker Koken. Or cook, I should say bake. Because Nick and I choose to make the Turkish Spinach cake. We love the Turkish kitchen and this is something that we never made before. It seemed interesting too. I figured it would be something like carrot cake. By that I mean that the carrots are in there but you can't taste them. It turned out I was right. Nick did most of the work on this cake. We changed it around a bit too, because Nick doesn't like the cherry pie topping, we left that out and we also put some cream cheese in the topping. I like that with carrot cake too and it seemed like a good idea. The cake did turn out great, so please don't be afraid to try it. Our cake looks a bit messy because we used the left over crumbles from cutting the cake on top and we always use parchment paper in our cake tin. It doesn't look that great, but it is very easy. You just lift the cake up with the paper and your cake tin stays clean.


Turkish Spinach Cake:
- 250 gr frozen spinach, defrosted
- 250 gr flour
- 200 gr sugar
- 150 gr sunflower oil
- 3 eggs
- 1 sachet (16 gr) baking powder
- 1 sachet (8 gr) vanilla sugar
- 1 tbsp lemon  juice
- pinch of salt

- 200 ml whipped cream
- about 50 gr cream cheese
- 1 sachet (8 gr) vanilla sugar
- 1 sachet (12 gr) klop-fix (makes your whipped cream more firm)


Pre heat the oven to 180 degrees. Line a sheet of parchment paper in a cake tin. Pout the oil with the spinach and puree this with a handheld blender. Mix eggs with both the sugars in a bowl until airy and creamy, about 10 minutes. Add the spinach with the lemon juice and mix through. Lastly sift the flour, baking powder and salt. Mix until the dry ingredients are incorporated. Bake in the oven for about 45 minutes. The cake is done when a toothpick comes out clean. Let the cake cool down.

For the filling we mix the whipped cream with vanilla sugar and the klop-fix. When the whipped cream is stiff, add the cream cheese and stir through. With a bread knife cut the top of the cake so it gets nice and even. Crumble those pieces and safe for later. Then cut the cake in half lengthwise. Spread the cake open and smear a layer of whipped cream on the cake with a big knife. Lay the top half back on the bottom half and spread the rest of the cream on top. Crumble the rest of the cake over it. Place the cake in the fridge to cool for at least 2 hours.


Wednesday, January 27, 2016

FoodBlogSwap: Avocado Spread

For the Foodblogswap of this month, Taste our Joy was the blog that we got assigned to cook from. They are two good friends, who share their passion for food and started a blog together. I always browse the recipe index and make a selection of recipes that seems tasty to make. From the five recipes I choose, three were spreads. It is not like they only have spreads on the blog, but I guess I was looking for a fairly healthy snack option and this was the outcome. I also had my eye on a mackerel spread and a sundried tomato egg salad. But because the avocados were on sale I picked that one to make. I just love avocados! We served it on a small Turkish bread as an evening snack on a Saturday. It is an easy recipe to make, maybe even too easy for a foodblogswap. But we enjoyed the spread and we will surely be making this again. I can also recommend making this for lunch.


Avocado Spread
– 2 avocados
– 1 clove of garlic
– pepper
– fresh parsley
– Italian herbs
– juice of half a lemon

Mince the garlic in a food processor. Add the avocado in pieces and the lemon juice and make a spread out of it. Add the other herbs to taste and pulse some more so the herbs get divided evenly. With this spread it is important to taste and adjust the seasoning until you think it is good.


Saturday, December 26, 2015

FoodBlogSwap: Cucumber Boats with Avocado

First of all: Merry Christmas everyone! In the Netherlands we celebrate 2 days of Christmas, so I am still allowed to say it ;)

For the FoodBlogSwap I was very happy that I got to cook from the Answer is Food. I actually made recipes from her blog before. Like this Pesto Couscous and Corn Soup. And there are some other recipes that I still want to try because she has a lot of recipes that are very suitable to pack in a Bento. However this time I picked a recipe that is suitable for New year's eve. We always have some friends over and of course we make snacks. So I choose to make her cucumber boats. She made them with salmon and sundried tomatoes. And while I love both, I choose to use avocado in mine. I love the combination of avocado and herbal cheese, so that is why I wanted to try that. On New year's eve I will probably make the sundried tomato version too.


Cucumber Boats with Avocado:
- 1 cucumber
- couple of spoonfuls herbal cheese (the original recipe says 60 gram, I just stuffed the cucumber without weighing the cheese)
- 0.5 avocado
- lemon juice
- toothpicks

Slice the cucumber in half length wise. Scoop out the middle with a tea spoon. Stuff the cucumbers herbal cheese. I used 2 dessert spoons to scoop in some cheese and spread it out evenly with a knife. This worked pretty well, even though it was still a bit messy.

Cut the cucumber into thick slices with a warm knife. Holding the knife under warm water really helped to slice neatly and the herbal cheese stayed on it's place.

Slice the avocado in little cubes and sprinkle lemon juice over them. Stick a couple of acovado pieces playfully on a toothpick and then stick it on top of a cucumber slice.


Thursday, November 26, 2015

FoodBlogSwap: Low Carb Spinach and Ricotta Muffins

Kleurrijk Eten is a blog that focusses on low carb recipes. Even though my blog don't focus on it, I am trying to eat less carbs. And especially less bread. So when I found this easy recipe for low carb spinach and ricotta muffins I knew I wanted to try those. And I am glad I did! I love the taste of these muffins, and even though they taste best warm, you cab also eat them cold. The original recipe said it would be for 12 muffins, but we got 20 muffins from this recipe. We served them with African Peanut Soup and that made a really tasty meal together. Next time some sun dried tomatoes might also taste good with these muffins.


Low Carb Spinach and Ricotta Muffins: (makes 20)
- 400 gr ricotta cheese
- 150 gr spinach
- 100 gr feta
- 50 gr parmazan cheese, grated
- 8 eggs
- 4 spring onions, chopped
- 1 tbsp olive oil
- 1 tsp oregano
- 1 tsp paprika powder

Pre heat the oven to 180 degrees. Bake the spinach in the oil and leave it to drain in a colander. Make sure the spinach is well drained.
Mix the 3 cheeses together. Beat the eggs and mix in the 3 cheeses and spinach. Also add the spring onions and spices to the batter. Grease your muffin tin. This isn't needed with you use a silicone mold like I do. Bake the muffins for about 20-35 minutes. Start to check your muffins at 20 minutes. This really depends on your oven. Ours took even 40. They are done when they are risen and nicely golden brown.


Monday, October 26, 2015

FoodBlogSwap: Asian Style Hamburger

It is time for another FoodBlogSwap. This time I made something from Great Little Kitchen. After browsing I found 4 potential recipes to make. A pasta salad with Italian cheese, an Indian fish curry, ricotta pancakes or Asian style hamburgers. I let my boyfriend choose and he chose the latter. We both love Asian flavours so a burger with an Asian twist was something that sounded very appealing.
I adapted the recipe a bit and used vegetarian hamburgers and spring onions. Next time I might add some mushrooms as well. 


Asian Style Hambugers (serves 2)
- 2 vegetarian burgers (we used AH brand)
- 1 spring onions
- 1 red bell pepper
- 2 buns with sesame seeds
- lime juice
- soy sauce
- sesame seeds
- olive oil

Cut the onion into rings and the bell pepper into cubes. Heat 2 pans with some olive oil. In one pan bake the spring onion and bell pepper together. In the other bake the hamburgers. Pour a bit of soy sauce in the pan with the bell pepper and onion with a squeeze of lime juice and some sesame seeds. Serve with burger on a bun with the bell pepper mixture on top. Would taste great with this simple Japanese cucumber salad


Tuesday, September 29, 2015

FoodBlogSwap: Granola with Cranberries

For this month's Foodblogswap I made granola from Kimberly Kookt. Her blog is full of inspirational and healthy recipes and it was hard to pick one. I eventually choose for the granola, because that is something I wanted to make for a long time, but was always a bit afraid of trying. Would I even like oats and all those seeds in my breakfast? But I wanted to try an alternative for eating bread in the morning for some time now, so I decided to give it a go and I have been eating this for the past 14 days already. I scoop 35 gr of the granola in a bowl and add vanilla yoghurt. This is enough for me to keep me full for about 3 hours. Kimberly's recipe had raisins but I replaced those with cranberries because I am not that much into raisins. This recipe is easily made vegan by replacing the honey for agave or maple syrup, but I used honey this time, because that is what I had.


Granola with Cranberries: (17 portions about 35 gr each)
- 300 gr oats
- 50 gr pine nuts
- 100 gr cranberries
- 50 gr grated almonds
- 30 gr sesame seeds
- 30 gr poppy seeds
- 30 gr chia seeds
- 1 tbsp cinnamon
- 3 tbsp honey
- 2 tbsp sunflower oil

Pre heat the oven to 180 degrees (the original recipe said 185, but my oven can only do 180 or 190 so I choose the former. In a bowl, mix all the dry ingredients, except for the cranberries. Mix in the oil and the honey and make sure that everything is covered.

Line your baking tray with parchment paper. Spread the mixture over the paper in a single layer. I had to bake my mixture in two batches. Place it in the oven for about 25 minutes and stir through halfway. Let the granola cool down and lastly add the cranberries. Store in an airtight jar.


Monday, August 24, 2015

FoodBlogSwap: Pancake Slices

For the foodblogswap from August I cooked from Koekies Enzo. While browsing the recipe index I saw an interesting recipe for a kind of pancake cake out of the oven. But that sounds a bit weird in English ;) So I translated them to pancake slices. Originally it is a breakfast recipe but I don't like to eat this much in the morning, so we made it for lunch instead. I found it the best on the same day. They next day I thought it was a bit dry. I stayed close to the original recipe but replaced the bacon with a vegetarian version. I think all kinds of variations are possible, like with real pancakes. I would like to try a variation with cheese or strawberries some time :)


Pancake Slices (Makes 1 cake)
- 225 gr spelt flour
- 300 ml milk
- 30 gr of melted butter
- 2 large eggs
- 2 tsp baking powder
- 100 gr vegetarian bacon
- pinch of salt

Pre heat the oven to 200 degrees. Bake the faux bacon in a pan for a bit until crispy. Leave them an a piece of kitchen towel to add to the batter later. Mix flour, baking powder and salt in one bowl. Mix milk, eggs and melted butter in another bowl. Add all the wet ingredients and 1/3 of the faux bacon to the dry ingredients and mix well.

Line an oven dish with parchment paper and place some faux bacon on the bottom. Add the batter and lastly scoop the rest of the vegetarian bacon on top. Place the dish in the oven for about 30 minutes. The pancake slices are done when a toothpick comes out clean.
Leave the cake to rest for 15 minutes before slicing.


Friday, July 24, 2015

FoodBlogSwap: Cinnamon Rolls

It is time for the monthly FoodBlogSwap again, an event where bloggers from the Netherlands cook from each others blogs every month. This month I got to cook from Eef Kookt Zo. Finding a recipe that I wanted to make was a bit tricky because there were a lot of meat recipes. But luckily there was also a selection of baked goods. I wanted to make cinnamon rolls for a long time but I never did because it is a bit out of my comfort zone. Perfect for a Foodblogswap! The original recipe had a cream cheese frosting but my boyfriend and I just made the basic recipe. I thought that they would be tasty enough on it's own and we choose not to add the extra calories ;) These rolls taste awesome and we will be making them again in the future, but not too often because with all that sugary goodness they aren't that healthy of course ;) That being said, I choose a second recipe to make that is healthy and I will share in a few days :)

Next time we will probably make these rolls in a muffin tin though, because our rolls didn't turn out very pretty, but they were tasty still and that is all that matters :) The plate shows only half the portion we got out of them, so the recipe makes a fair amount of rolls :) My boyfriend did the rolling and he made a mistake there. He just rolled single sheets, while you should roll multiple sheets to get bigger rolls. That is why ours puffed up the way they did. And I only found this mistake while I am writing this article and read the recipe again, because I wasn't involved in the rolling. So this calls for a do-over ;)


Cinnamon rolls:
- 1 can croissant dough
- 1 cup light brown castor sugar
- 2.5 tsp cinnamon
- 2 tbsp cornstarch
- 100 gr unsalted butter

Pre heat the oven to 200 degrees. Add all the ingredients except the dough together and mix until creamy. Open the can of dough and take one square sheet of dough. (the holes are in the middle). Roll the dough a little so the holes aren't visible any more. Smear some cinnamon butter on top. And roll the dough lengthwise.

Now you can repeat these steps and make single rolls like these on the picture or you roll each sheet into the next one so you get one big roll. Make sure you smear each sheet with cinnamon butter before rolling.

Cut the rolls(s) in 2 cm pieces. Lay them 2 cm apart on a tray covered with parchment paper and bake them for about 15 minutes.


Friday, June 26, 2015

FoodBlogSwap: Chocolade Spritsen

After the week of salad recipes things got quiet again on the blog. My school work swallowed me up again and the last week is the most busy one. I was thinking how I would fit in writing this FoodBlogSwap post in my busy schedule, but it seems I can't sleep this night. So I decided that I would sit down and just write it now, at 4am.

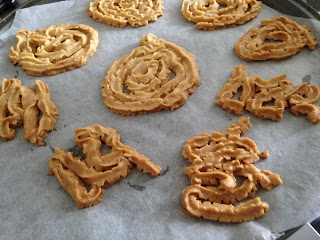
Last month I got totally out of my comfort zone with baking Gevulde koeken, a Dutch treat filled with almond paste. And this month it is no different. I was looking around at Kopje Thee, the assigned blog for this month, when I almost immediately saw what I would like to try: Chocolade Spritsen. Another Dutch treat that was on my to try list for ages, but I shied away from because of working with a pastry bag is kinda scary for me. But spritsen are one of Nick's favorite cookies, so we had to try it! We did replace the margarine with real butter, because that is the kind we like best.


It didn't go smoothly the first time around. Nick actually made the batter, and I was supposed to work the pastry. But it turned out the dough was too thick for me to handle because I haven't got much strength in my hands. So Nick worked the pastry too. We tried zig zag and round spritsen but they came out thin. It seemed that Nick forgot to add the baking powder, so with the second batch we added that in and some milk and they came out a lot better, as you can see below. So don't forget the baking powder and adding some milk surely makes it easier to squeeze the pastry out of the bag.


Chocolade Spritsen: (makes about 25) 
- 300 gr butter
- 200 gr light brown castor sugar
- 1 egg
- 2 sachets vanilla sugar
- 450 gr flour
- 1 tsp baking powder
- some milk
- a pinch of salt
- about 100 gr milk chocolate (we used less, but were only able to coat half of our cookies with it)

Melt the butter in the microwave, but make sure it doesn't boil. Mix butter and sugar until you have a creamy mixture. The add in the egg, vanilla sugar and salt. Sift baking powder and flour together and add this gradually to the butter mixture. Lasly see how thick your dough is and add in some milk.

Line your baking tray with parchment paper. Squeeze the dough out of the pastry bag in a zigzag motion or in a circle. Leave the dough to rest for an hour. Pre heat the oven to 175 degrees. And bake the cookies for about 20-25 minutes. Leave them to cool completely.

Melt the chocolate au-bain-marie and dip half of each cookie in the melted chocolate.


Thursday, May 28, 2015

FoodBlogSwap: Gevulde Koeken

First of all: I am very sorry that I have been so inactive in the past month. I am very busy with my school work to finish my 3rd year. Finding the time to write posts has been a struggle so I decided to let it go.

Of course when I commit to do something, I make sure that it gets done. The FoodBlogSwap is something that I love to participate in and I am happy to write my post today.
I was excited to cook from Geur van Maillard. But this is a challenge because Paul, the owner, loves to eat meat. As you all know: I don't eat meat for almost 10 years now. Even so it wasn't hard to pick a recipe that was fun but still out of my comfort zone.

I choose to make Gevulde Koeken, a typical Dutch large cookie. It is a challenge because while I love to bake, I usually keep it more simple than this. I also loved Paul's post about his struggles to make them. But I still wanted to try it for myself. Just like Paul, I found the amount of almond paste too much and I only used half (I used the other half to make luxury Appelflappen (apple hand pies)). But more on that in another post. I urge you to use a good quality almond paste because the cheaper brands add white beans to the mixture. I got mine from a local windmill who sells all kinds of flour and baking goods. The amount I used is already adjusted in the recipe.


Gevulde koeken: (makes 8)
- 500 gr flour
- 300 gr butter (the rich kind)
- 200 gr white castor sugar
- 3 eggs
- salt
- 200 gr almond paste
- almonds for decoration (optional, here they get plucked off, so I didn't use them)


Add flour, butter, sugar and 2 eggs to a bowl. Knead this into a dough. Leave it in the fridge for a while to rest.


Pre heat the oven to 160 degrees. Roll the dough until it is about half a cm thick. Stick 16 rounds from the dough. I used a glass for 8 smaller rounds and a mug for 8 slightly bigger rounds.
Line a baking tray with parchment paper and lay the 8 smaller rounds (or in case of a smaller oven like us 4, and bake it in 2 batches) on the paper. Divide the almond paste over the dough, leaving the edges clean. Place the bigger rounds over the smaller ones and press closed with a fork.
Beat the last egg and add a thin layer of egg wash on top of each cookie (which we obviously forgot).
Press 3 almonds in each cookie. Bake for 30-40 minutes.

I loved to make these and they tasted good! Still I am not sure if it is worth the trouble to make them again. This is mainly because the almond paste is expensive and it is just easier to get them from a good bakery. Still it was fun to do and not as hard as I thought :)


Saturday, April 25, 2015

FoodBlogSwap Extra: "Beef" Sushi Bowl

As I said earlier this week, I couldn't choose which recipe I wanted to make for the FoodBlogSwap. So I thought: why not make them both? I saw a recipe for a sushi bowl with beef on At Sowyen's Kitchen and it sounded so good, that I had to make that recipe as well, next to the Oreo Brownies that I shared earlier. I made quite a few adjustments to the recipe this time around. Because I don't eat beef, I used a replacement and I used some different veggies. The result turned out great and this will be on the menu more often, especially with the warmer days in sight. Or so we hope ;) We had some leftovers after we had it for dinner which we ate the next day for lunch. As the flavours develop over night, it tastes even better!


"Beef" Sushi Bowl: (serves 3)
- 140 gr sushi rice
- 250 gr faux beef (In Dutch store AH)
- 1 clove of garlic, chopped
- 1 tbsp soy sauce
- 0.5 tsp sugar
- 2 tbsp sesame oil
- 1 egg per person
- 1 bell pepper, cubed
- 1 courgette, cubed
- sweet chilli sauce
- pepper

Cook the sushi rice in the rice cooker.
Meanwhile mix the garlic with sesame oil, soy sauce, sugar and a dash of pepper in a bowl. Add the faux beef and let it rest for 10 minutes.

Heat some oil in 2 frying pans. In one pan bake the faux beef with the bell pepper and courgette. It is done when the veggies are done because faux beef only needs to warm. Bake the eggs sunny side up in the other pan.

Mix the rice, veggies, faux beef together. Stir in some chilli sauce to taste and serve with the egg.


Thursday, April 23, 2015

FoodBlogSwap: Oreo Brownies

The FoodBlogSwap is an event amongst bloggers from the Netherlands. You cook from a blog and someone else makes something from your blog. Each month this is great fun and I love to participate. It is a great way to discover new blogs. This month I got to make something from At Sowyen's Kitchen. And I couldn't choose so I decided to bake and to cook something from her blog. Another recipe will follow this week. First I will share the recipe for Oreo Brownies. I love Oreos and brownies, so this combination I really wanted to try. They tasted really great. We shared them with friends and they all agreed. We adapted the recipe slightly because my boyfriend Nick doesn't like dark chocolate very much, so we used milk chocolate instead.


Oreo Brownies: (makes 16)
- 165 gr unsalted butter
- 200 gr milk chocolate, chopped
- 4 eggs
- 165 gr light brown castor sugar
- 3 tbsp flour
- 1 tbsp cocoa powder
- 16 oreo cookes, in chunks

Pre heat the oven to 180 degrees. Line an oven dish with a baking sheet.

Melt the butter in a pan and remove from the heat. Add the chocolate and stir until the chocolate melted and the butter and chocolate form a nice mixture. Let it cool down to 37 degrees. We don't have a thermometer but you can check, because your body temperature is about the same. So carefully check with a clean finger and if it is about the same, it is all good :)

Beat the eggs until they are tripled in size. Add the sugar gradually while you keep mixing until combined. Then carefully combine with the chocolate mixture and stir this together until smooth. Do not use your mixer anymore. Stir in the flour and cocoa powder plus 1/3 of the oreos and stir again carefully until combined.

Pour the batter into the oven dish and add the rest of the oreo cookies on top. Bake for 30-35 minutes, but it depends a bit on your oven. Ours took 40 minutes to get a nice soft texture but not too runny on the inside. Let the borwnies cool down before you cut them into squares.


Tuesday, March 24, 2015

FoodBlogSwap: Homemade Fish Burgers

It is time for another FoodBlogSwap! This is an event where bloggers from the Netherlands cook from each others blogs. It is great fun to see each month what people choose to make :) This month I cooked from Ik kook ook. I read that Yvanka, the blog owner, uses her blog in the same way I do. As a reference to the recipes she likes.

I scrolled through her blog until I found something to my liking, but this didn't take very long because I found a recipe for kids proof fish burgers. I wanted to make my own fish burgers for a long time, but this didn't happen yet. And while I don't have kids, my boyfriend Nick is a bit of a picky fish eater. He only eats the white fishes like cod and ones which taste similar. But we both love to make burgers so this we had to try. I didn't change anything to the recipe itself but we did dress the burgers with an avocado and sour cream topping. We served them with baked potatoes for a nice weekend meal.


Homemade Fish Burgers: (Makes 4)
- 400 gr cod fish
- 2 tbsp spelt flour
- 2 tsp paprika powder
- 1 tbsp maple syrup
- a handful fresh parsley
- dash of sea salt
- olive oil
- 2 tbsp sour cream
- 1 avocado
- burger buns

Chop the parsley. Place all the ingredients in a food processor, except for the avocado, sour cream and olive oil.  Pulse until you get a bit of a minced meat structure. With wet hands for 4 burgers.

Heat some olive oil in a pan and bake the burgers for about 5 minutes on each side on medium heat.
Meanwhile, remove the pit from the avocado, and mash it together with 2 tbsp of sour cream. Spread the cream on one side of a burger bun and place the fish burger on top.

As you can see, ours fell apart a bit, but they still taste great! We served them with baked potatoes as a weekend meal. But of course those will go great with veggies as well, or dress them up even more with some tomatoes and cucumber and serve them alongside a salad.


Monday, February 23, 2015

FoodBlogSwap: Polpette di Melanzane (Eggplant Balls)

For the monthly foodblogswap I had to cook something from Cucina Casalinga. This is a blog with authentic Italian recipes for people with diabetes. I love to try Italian inspired recipes, even though not all are always authentic and there were several recipes I would like to make. I have biscotti still high on my list to try. However I choose to make a snack recipe instead. Even though you can also serve these eggplant balls with a good tomato sauce and pasta (which I will probably do another time). I choose this recipe because we love to snack in the weekends, but the vegetarian snack options are still fairly limited in the supermarket. Often we end up with the same stuff or making our own, and this seemed like a good idea, because we both love eggplant. We didn't get them to be as perfectly round, but they still tasted great and we will make them more often. Because we always take pictures on the go and we made them on a Saturday evening, sadly the pic didn't turn out too great.


Polpette di Melanzane (Eggplant Balls): (about 30)
- 2 eggplants
- 2 eggs
- a handful grated Parmigano
- a handful breadcrumbs
- 1 clove of garlic
- salt, pepper and parsley to taste
- oil for deep frying

Bring a large pan with water to a boil. Wash and dry the eggplants and cut them into small cubes. Cook them for about 15 minutes. Drain the eggplant and leave to cool down in a colander to drain the access moist. When the eggplant has cooled down, grab a handful of eggplant at a time and press out as much moist as you can.
Place all the remaining ingredients (except the oil for deep frying) in a bowl and mix in the eggplant. The mixture should not be to wet nor to dry. If you try to roll the balls they should be firm and stick easily. You can always add more cheese or breadcrumbs if needed. Roll balls from the mixture. We had about 30.
For deep frying everyone uses their own method. I always use sunflower oil because it is cheap and a bit more healthy. Heat the oil in a large pan. You know the oil is hot enough when you drop a small piece of bread and that crunches up nicely. Deep fry the balls in batches for a couple of minutes for each batch until they are crispy on the outside and golden brown.


Friday, January 30, 2015

FoodBlogSwap: Millionaires Shortbread

I am only just in time with this month's foodblogswap because I have been sick again and I am still recovering. I still wanted to try to post this on time even though I much rather would watch some Downton Abbey with a piece of this shortbread ;) This month we cooked and baked from My Happy Kitchen. Nick and I both choose a recipe to make so there will be another recipe posted later. Probably after the deadline, but that is okay, because the 2nd recipe is an extra post. Nick wanted to make this recipe because it was translated as Twix Pie, and Twix is a candy bar Nick likes very much. For me this recipe was a bit too much, but Nick and the friends we had over the weekend we made this, all enjoyed it very much :)


Millionaires Shortbread: (serves 12)
For the bottom:
- 125 gr flour
- 125 gr soft butter
- 115 gr dark castor sugar
- 80 gr oats

For the caramel and chocolate layers:
- 60 gr butter
- 4 tbsp dark castor sugar
- 1 can sweet condensed milk
- 100 gr dark chocolate

Pre heat the oven to 180 degrees and grease a baking tin or spring form. Mix all the ingredients for the bottom in a bowl. Add the mixture on the bottom of your tin evenly and press it down. Bake for 20 minutes in the oven and let it cool slightly.

Melt 60 gr butter in a pan on low heat. Add the sugar and stir until all sugar is resolved, about 5 minutes. Add the condensed milk and bring to a boil while you keep stirring the mixture. Put the heat on low again and keep stirring for 4 to 5 minutes until the caramel thickens. Add the caramel on top of the bottom layer and spread evenly. Leave it to cool down for about 15 minutes. Then place it in the fridge for another 30 minutes.

Melt the chocolate au-bain-marie. Pour the chocolate over the caramel and place in the fridge again for 30 minutes so the chocolate hardens. Remove from the fridge about 20 minutes before serving.


Monday, December 22, 2014

FoodBlogSwap: Green Toastie

Yep, even in the busy December month I am participating in the FoodBlogSwap :) It is just too much fun to skip. This month I cooked from Spruitjes zijn niet vies. The name of the blog originated out of the fact that many people dislike Brussel sprouts without even willing to try them. So, the obvious choice here would be to make something with Brussel Sprouts. The thing is that we actually tried to make them on different ways when we still had a vegetable bag, where you couldn't choose which veggies you would get, but just ate what was in the bag. But no matter what we tried, we didn't seem to like them. So Nick wasn't very enthusiastic about that idea. I mostly let him choose for the foodblogswap, after I make a selection of 5 recipes or so to choose from. And he choose the Green Toastie, which was a really filling and satisfying lunch! Do excuse the keyboard picture. When we made this a friend unexpectedly had stayed over night and I just made a quick snapshot before eating. On the plus side, he got to enjoy one of these toasties too, and he really liked it!


Green toastie: (serves 1)
- 2 sandwich slices
- about 4 slices of courgette
- green pesto
- 4 slices of mozzarella
- feta crumbles, the amount of 4 slices
- 4 basil leaves
- 1/4 avocado
- some butter

Heat some oil in a pan and bake the courgette on both sides until they are done (about 4 minutes). Slab some butter on your slices and place the buttered sides together, because this will be the outside of your toastie. Spread some pesto on the inside and layer mozzarella, avocado, basil and courgette. Crumble some feta on top. Press the other slice on and bake in a pan until both sides are crispy, for about 5 minutes.

In the original recipe there were also mint leaves, but I am not a real fan of those. I loved this toastie, but personally I thought both feta and mozzarella is a bit much. I prefer the mozzarella. This is a great way to get rid of some leftover veggies though. I bet some spinach would be good on this too :) And just use whatever cheese you have laying around :)


Monday, November 24, 2014

FoodBlogSwap: Red Pesto

Last month there wasn't a FoodBlogSwap, so that is why you missed it on the blog. But this month it was back! I got to cook from the blog Eten van Eefke. I love the clean but fun layout of her blog. It is full of easy to prepare recipes which are mostly gluten and lactose free. I choose to make her red pesto, because I had this on my to-make list for a long time, so this was a nice chance to actually do so. I liked it very much and given how easy it is, I will make it again for sure. Also, there is a small amount of Parmasan is this recipe. But without the cheese it is lactose free, and also vegan. I used the pesto in an oven dish, but that recipe will follow later.


Red Pesto:
- 125 gr sundried tomatoes from a jar
- 2 cloves of garlic
- 30 gr pine nuts
- 30 gr Parmasan cheese (optional)
- olive oil
- salt and pepper

Roast the pine nuts in a frying pan. Do not use oil in the pan, just roast them dry. Mix the tomatoes, garlic, pine nuts and cheese in a food processor. Add some olive oil until the pesto has the thickness you desire. It is a very nice touch to use the oil from the jar of sundried tomatoes for extra flavour. I love that and I use the oil from the tomatoes all the time when I cook with them. Add salt and pepper to taste.

I used the biggest part in an oven dish, but the leftover I used to make marcarpone and pesto toasties. The pesto was gone in 2 days. If you want to store it up to a week, put the pesto in a small jar and use enough olive oil to cover the pesto.


Thursday, September 25, 2014

FoodBlogSwap Extra: Lettuce Soup

Another fun recipe that I found on Gewoon Lekker Koken, the blog I was assigned for the Foodblogswap. I ate lettuce soup one time before, but never made it myself. That needed to change. I love to use lettuce in other ways than in a salad, so the choice for this recipe was easily made. This is the perfect recipe for the last summer days because it is still light but also warm. I loved the egg that is added at the last moment. It gives the soup a little extra. We served some bread with herbal butter on the side to make it a meal.


Lettuce Soup (serves 2)
- half a head of butter lettuce
- 1 spring onion
- 1 clove of garlic
- 500 ml vegetable broth
- 50 ml cooking cream
- 1 hard boiled egg
- pepper and fresh chives

Wash the lettuce and cut the leaves smaller. Save 2 leaves from the heart and put aside for later. Cut the spring onion into rings and mince the garlic. Heat some butter in a soup pan and bake garlic and onion for about 2 minutes. Add the lettuce and stir until the leaves have shrunk. Add the vegetable broth and bring to a boil. Turn the heat to low and leave the soup to simmer for about 10 minutes.

Mash the soup with a handheld blender and add the cooking cream. Season to taste with pepper. I don't add any extra salt because there is enough in the broth. Garnish the soup with the lettuce leaf and scoop in some egg pieces and chopped chives.


Monday, September 22, 2014

FoodBlogSwap: Apple Sauce

For this months Foodblogswap I was cooking from a blog called Gewoon Lekker Koken. The blog has some easy accessible recipes and is just about non nonsense and tasty food. It seems that I am getting in the habit of cooking multiple recipes from a blog in the past months, because I did so again this month. I choose the apple sauce because it was something that was on my to make list for a long time, but I never felt comfortable enough to do so. But it seemed easy enough, so I thought I would give it a try. Especially since Mabon was approaching at the time I made this and apple recipes fit that theme perfectly. Mine did turn out a bit then. Maybe I used a bit too much water, but it was tasty!

 
Home made Apple Sauce (serves 2)
- 1 apple per person (so in this case 2)
- sugar
- cinnamon

Peel the apples and cut them in little pieces. Bring apples with a tiny bit of water to a boil. Turn heat to low and leave the apples to simmer until they are soft. Stir regularly and break up the apples each time you do so. It will take about 30 minutes for the apples to soften. When the apples are soft, transfer them to a bowl and mash them until you have the structure you want. We used the handheld blender because we like a smooth apple sauce. But just mash it with a fork, if you like it chunky. Add sugar and cinnamon to taste.